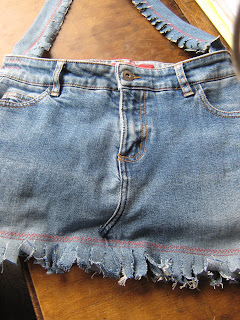
Ok, here is one of my favorite projects :).

Jeans Handbag
For this project I would advise a beginner to get the help of someone with an intermediate skill with a sewing machine before starting.
What you will need:
An old pair of jeans
Satin or some nice fabric for the lining
Pair of sharp scissors
A quick-un-pick (or a small pair of pointy nosed scissors)
Needle and thread (choose the thread to contrast or blend in with the colour of your jeans, I chose to contrast).
A sewing machine (or a strong arm or two :) it is best to use a sewing machine because its really hard to sew denim by hand).
A handbag clasp (I have yet to figure out what to use for mine, I have an old handbag clasp that I took out of a handbag from the op-shop, but you could use a button, or Velcro strips, or even magnets, this is where you need to use creativity).
Instructions
1. Lay the jeans right side up on a flat surface, a table or the floor, make sure there are no wrinkles, because they will get in the way when cutting.
2. Get the scissors and cut across the jeans legs about an inch down from the crotch. Cut in a straight line.
3. Using your quick-un-pick (or scissors) un-pick the small part of the in-seam and continue unpicking up to the bottom of the zip. Un-pick up the back of the jeans to about the same spot as the front.
4. Lying it back on the table try to get the jeans to lie flat by overlapping the crotch at the front and the back. Once you have it lying flat you can pin the front and the back but make sure you haven't pinned the front and the back to each other :).

6. Pin the bottom edges of the jeans together, leaving the raw edges on the outside (refer to photo for 4.) and sew with straight stitch (I also used a decorative stitch but if your machine doesn't have that don't worry!).

7. Using the left over legs of the jeans cut a strip of denim the length of the leg and 4 inches wide. Fold in half with wrong sides together and sew (I used the same decorative stitch as the bottom) with 1/2 inch seam allowance and raw edges out (refer to pic). Get your scissors and cut into the seam allowance almost to the seam, making a fringe.
8. Lay your satin on top of the jeans, doubled up with right sides together, using the fold as the bottom of the lining, cut around the bag leaving 1 inch for seam allowance
This is where it gets confusing, lol! Sorry :/
9. Sewing up the sides you now have two bags, the satin one and the jeans one. With the seams on the outside, fold the top edge of the satin bag down the outside of the bag half an inch, place the satin bag inside the jeans one, matching the seams at the top pin the top edge of the satin bag inside the jeans bag just under the waist band (this is where you will want to check to see if your lining fits your bag, do it now before you sew so you wont have to un-pick any if you need to. If your lining is too large fold the top edge down or take it out and sew a larger seam allowance, if the lining is too small you will have to make another one), making sure that the seams of the satin bag are on the outside (inside now), between the jeans and satin bags.
10. Thread your needle with a very similar coloured thread to the lining and slip stitch around the top of the lining keeping your stitches small so they are almost invisible.
11. Taking the handle you made in step 7. turn the raw ends up one side (making sure that both ends are turned up on the same side) and place on the inside of the waist band on the side seams and sew securely.
12. Now using your creativity fix your choice of handbag clasp onto your bag. Maybe sew some buttons onto your bag to add personal touch and go and have fun with it!


No comments:
Post a Comment