Friday, October 9, 2009

A post in a long time!

Ok, I haven't been the best at posting on this blog and I am sorry because I have done a lot of projects that I could have posted here but hadn't thought too and when I did think I didn't get a round to it :P!
Ok, here is one of my favorite projects :).

~~~~~~~~~~~~~~~~


Jeans Handbag

For this project I would advise a beginner to get the help of someone with an intermediate skill with a sewing machine before starting.

What you will need:

An old pair of jeans

Satin or some nice fabric for the lining

Pair of sharp scissors

A quick-un-pick (or a small pair of pointy nosed scissors)

Needle and thread (choose the thread to contrast or blend in with the colour of your jeans, I chose to contrast).

A sewing machine (or a strong arm or two :) it is best to use a sewing machine because its really hard to sew denim by hand).

A handbag clasp (I have yet to figure out what to use for mine, I have an old handbag clasp that I took out of a handbag from the op-shop, but you could use a button, or Velcro strips, or even magnets, this is where you need to use creativity).

Instructions

1. Lay the jeans right side up on a flat surface, a table or the floor, make sure there are no wrinkles, because they will get in the way when cutting.

2. Get the scissors and cut across the jeans legs about an inch down from the crotch. Cut in a straight line.

3. Using your quick-un-pick (or scissors) un-pick the small part of the in-seam and continue unpicking up to the bottom of the zip. Un-pick up the back of the jeans to about the same spot as the front.

4. Lying it back on the table try to get the jeans to lie flat by overlapping the crotch at the front and the back. Once you have it lying flat you can pin the front and the back but make sure you haven't pinned the front and the back to each other :).
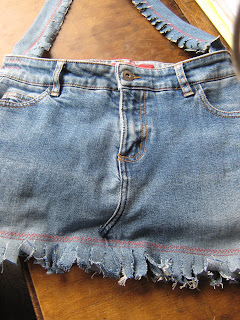


5. Once you have pinned it you can now sew along the lines where the old stitching was (the great thing about using old jeans like this is you are allowed to do thing like this). Again DON'T sew the front and the back together!


6. Pin the bottom edges of the jeans together, leaving the raw edges on the outside (refer to photo for 4.) and sew with straight stitch (I also used a decorative stitch but if your machine doesn't have that don't worry!).


7. Using the left over legs of the jeans cut a strip of denim the length of the leg and 4 inches wide. Fold in half with wrong sides together and sew (I used the same decorative stitch as the bottom) with 1/2 inch seam allowance and raw edges out (refer to pic). Get your scissors and cut into the seam allowance almost to the seam, making a fringe.


8. Lay your satin on top of the jeans, doubled up with right sides together, using the fold as the bottom of the lining, cut around the bag leaving 1 inch for seam allowance

This is where it gets confusing, lol! Sorry :/

9. Sewing up the sides you now have two bags, the satin one and the jeans one. With the seams on the outside, fold the top edge of the satin bag down the outside of the bag half an inch, place the satin bag inside the jeans one, matching the seams at the top pin the top edge of the satin bag inside the jeans bag just under the waist band (this is where you will want to check to see if your lining fits your bag, do it now before you sew so you wont have to un-pick any if you need to. If your lining is too large fold the top edge down or take it out and sew a larger seam allowance, if the lining is too small you will have to make another one), making sure that the seams of the satin bag are on the outside (inside now), between the jeans and satin bags.

10. Thread your needle with a very similar coloured thread to the lining and slip stitch around the top of the lining keeping your stitches small so they are almost invisible.

11. Taking the handle you made in step 7. turn the raw ends up one side (making sure that both ends are turned up on the same side) and place on the inside of the waist band on the side seams and sew securely.

12. Now using your creativity fix your choice of handbag clasp onto your bag. Maybe sew some buttons onto your bag to add personal touch and go and have fun with it!


Saturday, May 17, 2008

Lemon Meringue Pie
(This is an old family favorite)

1/2 Quantity apple pie pastry

FILLING
3 TBS Cornflour
Pinch salt
3/4 cup sugar
1 1/4 cups water
3 egg yolks
4 TBS lemon juice
1 tsp finely grated lemon rind
60g butter

MERINGUE
3 Egg whites
Pinch cream of tarter
1/2 cup castor sugar
Sifted icing sugar

Roll pastry to fit a 20cm pie plate. Line the pastry with baking paper and fill with rice or dried beans. Bake blind in a moderately hot oven (190 deg) for 25 mins.
During the last 10 mins, remove the paper and beans and allow the base to cook through. Place on a rack to cool.

FILLING: Mix the cornflour, salt and sugar in a saucepan and blend in the water. Stir over a moderate heat until the mixture boils and thickens. Lower the heat and cook 5 to 6 mins, stirring occasionally, to cook the starch in the cornflour.

Remove from the heat. Lightly beat the egg yolks, lemon juice and rind together. Whisk into the cornflour mixture and then place over a very gentle heat for 2 mins, stirring all the time. Beat in the butter which has been cut into pieces and then pour immediately into the prepared pie crust.

MERINGUE: Beat the egg whites and cream of tartar until very thick and standing in peaks. Gradually add the sugar 2 TBS at a time. Beat until all sugar dissolves.

Spread the meringue over the filling, shaping it into peaks. Dust with icing sugar and bake in a moderate oven (170 deg) for about 10 mins or until lightly browned. Allow to cool before serving.
Chocolate Velvet Mousse
Ingredients
150g dark chocolate
3 eggs, separated
1 egg white
75g unsalted butter, cubed
2 tsp vanilla extract
Pinch salt
Melted plain chocolate,
to decorate

Serves six
Keeps for one week, covered in the fridge.
1Melt the chocolate. While still hot, beat in the egg yolks, one at a time. Stir in the butter and when the mixture is smooth, add the vanilla extract.

2 Whisk all 4 egg whites with a pinch of salt until the whites form stiff peaks. Fold a heaped spoonful of the whites into the chocolate mixture to lighten it, then carefully fold in the remaining whites.

3 Turn the mixture into the dish and chill it is set (about 4 hours)

4To serve, warm a serving spoon in hot water and then dip the spoon the mousse and make an oval-shaped scoop. Put scoops round side up on the plate, to decorate pipe lines of melted chocolate on top using a tooth pick to pull it into a pattern.

Friday, May 16, 2008

Apple Pie
Serves 8- 10
8 large apples
1/4 cup sugar
1/2 cup water
1/4 tsp cinnamon
1/3 cup sultanas
185g butter, cubed
1/2 cup sugar
1 egg separated
1 1/2 cups flour
3/4 self raising flour
1/3 cup corn flour
1/2 cup milk, for glazing
Extra sugar
Extra cinnamon
Peel, quarter, core and slice apples and place in a large saucepan with the sugar, water and cinnamon. Bring to the boil, reduce heat and simmer, covered 8 minutes, or until the apples are render but still hold their shape. Drain apples if any liquid remains and stir in the sultanas. Cool. Cream the butter and sugar together, then beat in egg yolk. Add the dry ingredients and kneed into a dough. Roll out 2/3 of pastry and use to line base and sides of greased 20cm spring form tin and spread the apple mixture evenly over base. Roll out remaining pastry to cover the pie. Seal edges together and trim. Brush top with the lightly beaten egg white, sprinkle with extra sugar and cinnamon. Cut two slits in the top. Bake at 180C for 15 minutes reduce heat to 150C cook for 35 minutes, or until pie is golden brown and pastry is cooked. Serve hot or cold with cinnamon cream or ice cream.
Decadent Chocolate Cookies
250g unsalted butter
100g dark chocolate
2 cups brown sugar
4 eggs
2 1/2 cups plain flour
1/3 cup cocoa
1 cup Pecans or walnuts chopped
1/2 cup roasted hazelnuts chopped
90g sultanas
100g packet Choc bits
100g white chocolate

Melt butter and dark chocolate in large
heat proof bowl over hot water. Stir in sugar and eggs, then sifted flour and cocoa, nuts, sultanas, choc bits and white chocolate. Drop tablespoons of mixture into greased cup cake tins or onto oven trays. Bake in moderately hot oven for 10 minutes, or until just set, lift onto wire racks to cool.
Makes about 50

Chocolate Nut Fudge
200g packaged marshmallows
60g butter
1 tablespoon water
1 teaspoon vanilla essence
125g dark chocolate, chopped
125g chopped walnuts

Combine marshmallows, butter and water in saucepan. Stir over low heat until butter and marshmallows are melted. Remove from heat, stir in vanilla essence and cholate, beat with wooden spoon until it begins to thicken. Stir in nuts; mixture should be thick and sticky. Spread mixture into 8cm x 26cm bar pan. Refrigerate for several hours before cutting.